5 Cat Pumpkin Carving Ideas to Try at Home

Carving pumpkins is one of the most important—and fun—ways to decorate for Halloween. And every year households are getting more and more creative with their Jack-o’-lanterns as they get into the spooky holiday spirit. You can find all kinds of fun and creative pumpkin carving ideas on Pinterest and social media, including many different cat pumpkin designs.
Cats have been associated with Halloween for centuries. The holiday itself goes back about 2,000 years, originating at the ancient Celtic festival of Samhain, where the Celts would light fires and put on costumes to try to scare off ghosts and evil spirits. In Celtic mythology, Cat Sìths—fairy creatures resembling black cats with white spots on their chests—would haunt the Scottish Highlands and could steal souls. Yikes! Cats, especially black ones, have continued to be associated with superstitions, bad luck, and, of course, Halloween.
Whether or not you own a cat, a cat pumpkin can be a fun addition to your Halloween decor this year. Here are five different designs you can try at home, plus tools and tips for a successful pumpkin cat carving project!
Cat Pumpkin Carving Tools

Once you decide which cat pumpkin design you want to make, you’ll need to get the right supplies. Here’s a list of things you may need to carve the purr-fect cat-o’-lantern this Halloween:
Halloween Pumpkin Carving Kit
For any pumpkin carving design, you’ll need a good carving kit. Most will include several different sized knives, an etching tool, a drill, and a pumpkin scooper. Some carving kits even come with stencils. Having a good set of carving tools will make your pumpkin cat carving much more successful.
Cat Pumpkin Carving Stencil
Not everyone is an artist. Having a cat pumpkin carving template is much easier than drawing freehand and there are endless cat pumpkin designs to choose from. This is also a great way to get pumpkin carving cat ideas.
Construction Paper, Glue, and Toothpicks
Depending on the cat pumpkin design you choose, you may need a few sheets of black, white, and pink construction paper, as well as a good pair of scissors and some crafting glue or a hot glue gun. You might also need toothpicks to attach cat ears and feet.
Black Paint
To make a black pumpkin cat, you’ll need some quick-drying black glossy acrylic paint. It’s also important that it’s non-toxic and can easily be washed off of skin, clothes, floors, fur, and furniture. You can use other paint colors for eyes, nose, ears, and whiskers if you wish.
Ribbons
One way to jazz up your cat pumpkin is with some festive ribbons. Simply attach using a few dabs of crafting glue. You can also use these ribbons to tie around a pumpkin in a bow.
Plastic Sheet or Tablecloth
Carving pumpkins is messy, especially if you are dealing with glue and paint. Be sure to cover your workspace and preferably do the carving outdoors.
5 Pumpkin Cat Carving Designs to Try at Home
You can find hundreds of different cat pumpkin designs when you search for them. There are pumpkin cat carving stencils for anything from funny Cheshire cat pumpkins to spooky black cat pumpkins. Here are five different pumpkin cat carving ideas to help you ramp up your Halloween decor this year. We tried them out, and we’re already receiving so many compliments on them!
Simple Cat Pumpkin

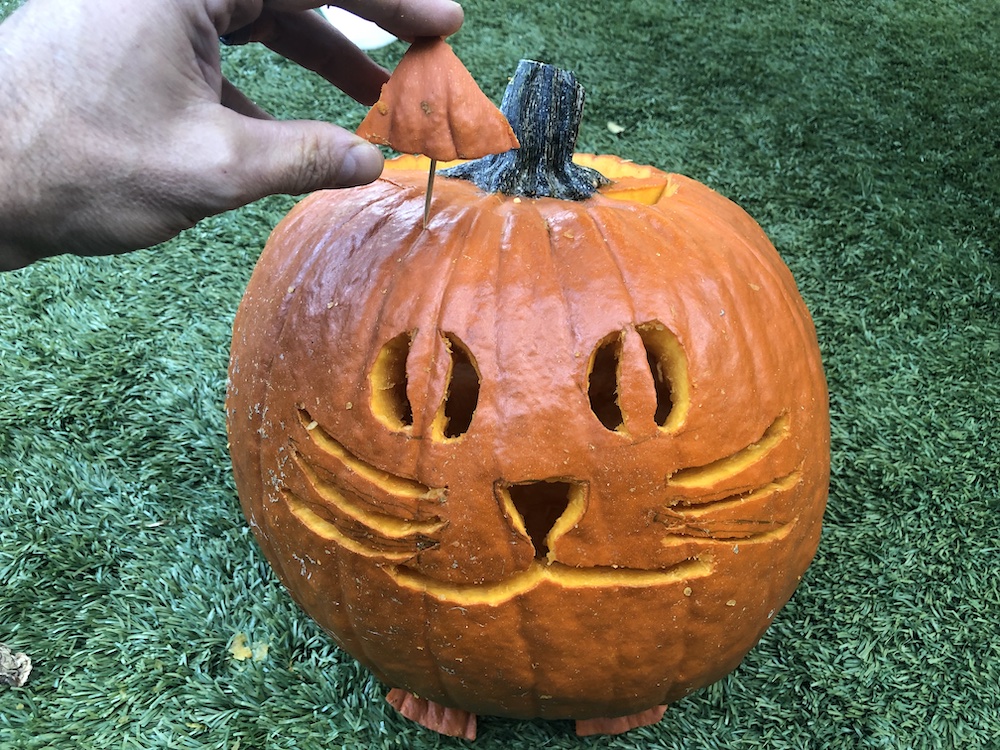
This first one would be considered an easy cat pumpkin carving and can be done without a cat pumpkin stencil on just about any size pumpkin.
First, cut open the top and hollow out the seeds as you would to carve any other pumpkin.

Next, pick out the best side of the pumpkin and draw the cat’s eyes, nose, ears, and whiskers. You can use quarters or a cap from a small jar or vitamin bottle to make circles for the eyes.
You can draw directly on the pumpkin or sketch out your cat face on a piece of paper, tape that to the pumpkin, and use it as your guide. Then, carve out the design.

That’s it! Drop in a candle and you are ready for Halloween!
Cat with 3D Feet and Ears Pumpkin

This next one is a really cute cat face pumpkin with adorable ears and cute little cat feet. You’ll want to use a bigger pumpkin for this design since there are some smaller details that would be difficult on a smaller pumpkin.
This one is perfect if you’re looking to carve a huge cat pumpkin. You also won’t need pumpkin carving cat templates for this.
Follow the same steps as the Simple Cat Pumpkin, but for this one you’ll be using part of the top to make the ears and feet.

When it comes to making the ears, draw little triangles on the removable lid of the pumpkin. Do the same thing for the feet. Then cut them out.
We suggest taking the feet and ears from the back of the lid so that you won’t see that they are missing when you close the pumpkin.

Attach them to your pumpkin with toothpicks and you’re done!
Black Painted Construction Paper Pumpkin

If pumpkin carving isn’t really your thing or you just want some variety to your Jack-o’-lantern collection, you can make a cat face on a pumpkin. Any size pumpkin can be used for this.
Paint the whole pumpkin black, including the stem. Then use construction paper to make the ears, eyes, nose, mouth, and whiskers.
After the paint is thoroughly dried, use crafting glue or a hot glue gun to attach the cut outs to the pumpkin. For the ears to stand up, tape toothpicks to the back of the paper and insert them into the top of the pumpkin.
You can have a lot of fun with this one and can try as many times as you like to create the perfect cat face since there is no carving involved! Feel free to get creative.
Kitten Collection Pumpkin

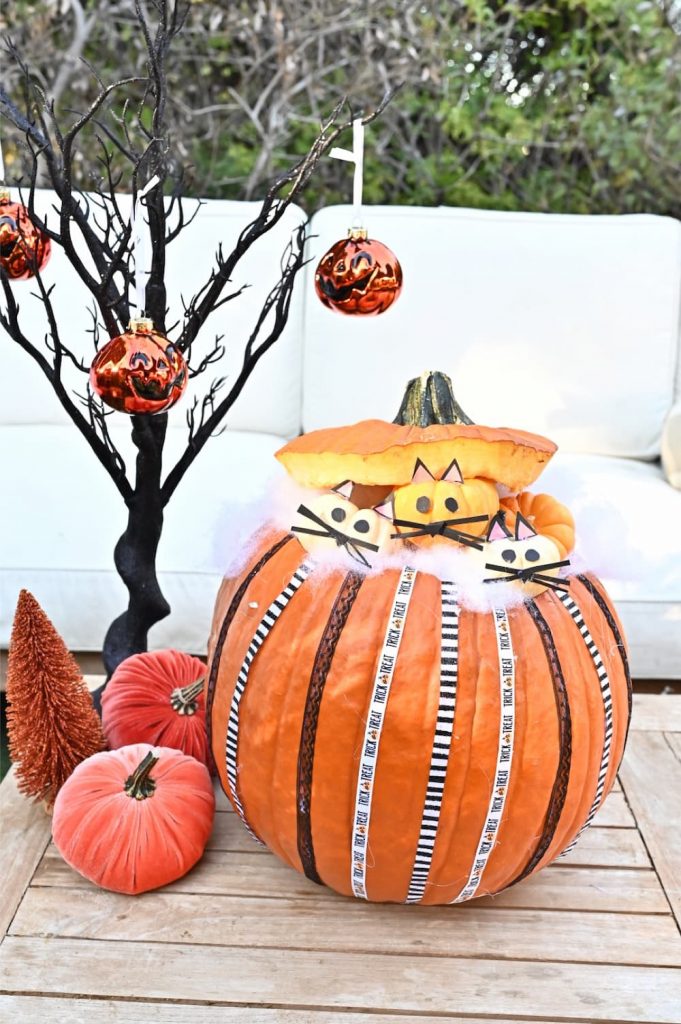
What’s cuter than kittens? Pumpkin kittens! This adorable kitty collection will surely catch the attention of your neighbors. You will need one big pumpkin and a few tiny ones for the babies.
Start by hollowing out the big pumpkin. Add some flair with some fun Halloween ribbon, which can be attached with crafting glue or a hot glue gun.

To make kitten faces on the tiny pumpkins, use construction paper for the eyes, noses, and whiskers. Attach the cut outs to the pumpkin with crafting glue or a hot glue gun.

Fill the big pumpkin with Poly-Fil or cotton, set the tiny kittens inside, and then angle the lid on top. Adorable!
Black Spooky Cat Pumpkin

If you’re searching for the ultimate black cat Halloween pumpkin, look no further. For this one, you will need a gourd with a long “tail” and a smaller pumpkin to be used for the cat’s head. Start by painting everything black.

Once the paint is thoroughly dry, attach the head to the body using toothpicks. If you want it to stay on extra tight, you can squirt some glue onto the head before attaching it to the “body.”

Next, paint the eyes with a different color. Pink, yellow, green, red, or orange work best. You can also use construction paper for the eyes, which we did for ours. For the ears, use black construction paper and attach them with toothpicks taped to the back.
Lastly, tie a Halloween ribbon into a bow around the cat’s neck for a festive collar. What a masterpiece!
Cat Pumpkin Carving Tips

Carving a cat pumpkin can be a bit of a challenge, especially for kids. But the good news is that you don’t have to be a crafty DIY expert in order to pull off carving a great cat pumpkin. Here are a few tips that will help your pumpkin cat carving adventure be a little easier and more enjoyable:
Pick the right pumpkin. You’ll want to have your cat pumpkin design picked out before buying a pumpkin. Look for one with a good shape, a good “face” for your design, and a pumpkin without too many deep ridges, which can be difficult to draw over and cut around. Also be sure that the pumpkin is firm and that there aren’t any soft spots, which could mean it’s starting to rot.
Get the right tools. Having the right carving tools is key to good cat pumpkin carving. For more intricate designs, you’ll need different sized blades and if they aren’t brand new, you may want to sharpen the blades.
Hollow it out. Thoroughly hollow out all of the seeds using a good quality pumpkin scraper. If your pumpkin has a thick shell, you can scrape some of it away from the inside, which will make it easier to carve, especially for more intricate designs.
Draw it first. If you are drawing out the cat face by hand and not using a cat pumpkin carving template, you can first sketch it out on a piece of tracing paper or even on a paper towel. Once you get the drawing just how you want it, transfer the paper to the pumpkin and attach it with tape. You can then trace your drawing onto the pumpkin by pricking small holes around your design. Remove the paper and carve your pumpkin following the pinprick outline.
Pumpkins & Pets: Halloween Safety Tips

Cat pumpkin carving can get messy, and inevitably there will be pieces of pumpkin and seeds spilled onto the ground. Fortunately, you don’t have to worry if your pet eats some of the scraps. Pumpkin is actually very healthy for dogs and cats, as well as humans. It contains many vitamins including A, C, and E, and minerals like potassium and iron. Pumpkin is also high in fiber and great for a pet’s digestion. But too much pumpkin can give your pet an upset stomach and cause loose bowel movements. You can let your pets enjoy a bit of the carving scraps, but be careful they don’t get too much.
It’s also important to keep your pets away from the cat pumpkin carving station because you’ll most likely be using materials that can be dangerous for your pets. Be sure to keep sharp objects, paints, glues, pens, etc. away from your pets (and kids). Our suggestion is to do your pumpkin cat carving on a table and keep your pets out of the room. Then once you are finished, thoroughly clean up and put everything away before your pets return.
And lastly, if you are using real candles for your cat-o’-lanterns, be sure to display your cat pumpkins in a place where your pets can’t knock them over and possibly start a fire. Cats and dogs can be very curious (and many love the taste of pumpkin), so knocking them over can be a hazard. Many families opt for using flameless candles for this reason—some even come with a remote!


